Over the years, technology has developed rapidly. We find ourselves getting access to better and better hardware and software for our personal or professional use. One space that has been increasingly better would be storage devices. With so much data created and stored, storage devices such as flash drives or SD cards became essential. However, many users complain about SD card deleting files by itself in many forums. If you have the same SD card not working issue, you can continue reading to get more info.
Why Do Files Disappear from My SD Card
Many factors can affect data storage and potentially corrupt or even delete the files stored. One of the possible causes would be physical damage to the hardware. If you happen to drop or hit your SD card with enough force, it can potentially disrupt the intricate parts inside and cause damage to the data.
Another would be the lifespan of your storage device. Your SD card has a finite lifespan for keeping files safe, as with any other device. Once it starts to near the end of its lifespan, you may find your SD card deleting files by itself. Ensure to check with the manufacturer of the device and routinely check if the files are all intact or if there are any missing files.
Virus and malware can also cause devices such as your SD card to malfunction, corrupt, or delete your precious files.
How to Fix SD Card Keep Deleting Itself
We’ve compiled a list of methods you can try for yourself to fix any issues you may have with an SD card deleting files by itself.
1. Reinsert Your SD Card
Several reports have claimed that simply reinserting your SD card can solve the random auto-deletion of files. You can do this by following the steps below:
Step 1: On your device, navigate to Settings, click on Storage and tap on Unmount SD card to unmount the SD card. This makes it safe to eject the card.
Step 2: You can safely remove the SD card from your device and then reinsert it after a couple of seconds. Depending on your device, where the SD card is slotted and how to remove it may differ.
Step 3: Finally, remount the SD card and check whether the issue goes away. Hopefully, you stop finding your SD card deleting files by itself afterward.
2. Use CHKDSK Command
The CHKDSK (or disk check) command can inspect storage devices such as hard drives and SD cards for bad sectors or logical errors. Once spotted, you can use this function to either protect the bad sectors or repair the errors.
Step 1: Insert your SD card into a card reader on your desktop or laptop. This is built into the hardware or can be an external attachment. Then turn on your desktop or laptop.
Step 2: From the start menu or the search bar beside it, open the Command Prompt and click on the space on the pop-up to start typing.
Step 3: Enter chkdsk *: /r /f (with * representing the drive letter of the SD card) into the command prompt interface and then press Enter to run the disk check. You shouldn’t find your SD card deleting files by itself afterward.
3. Use SD Card Recovery Software
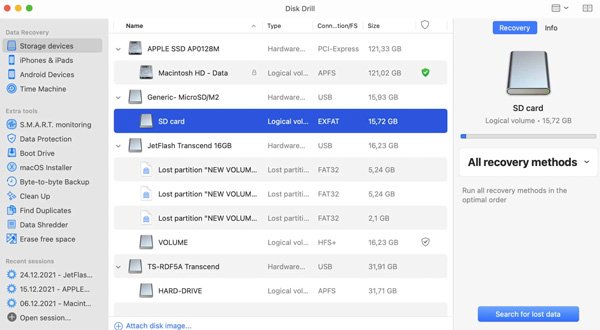
Disk Drill is a data recovery software designed for Windows users. It comes with a range of features, supports multiple file systems, helps create drive partitions, and helps recover lost or deleted data. You can use Disk Drill to retrieve up to 500MB of data from your computer’s hard disk or any external drive.
Step 1: Download and install Disk Drill on your PC. After a few minutes, you should have access to the program’s various features. Once launched, you’ll come across a window to proceed.
Step 2: Next, you can select the different file types that you wish to find. The menu lets you choose whether you want to complete a quick or deep scan. You can pause or save the scan anytime you find what you’ve been looking for. Since the program works on both internal and external drives, you can use it to scan files on storage devices like the SD card.
4. Run Windows Troubleshooter
Windows has a built-in general troubleshooter that aims to address any issues you may have with your computer and devices connected to it.
Step 1: Insert your SD card into a card reader on your desktop or laptop, built into the hardware or an external attachment. Then turn on your desktop or laptop.
Step 2: Select Começar or click on the search bar and type Control Panel. The panel should display the option to click on Control Panel. Instead, look at the options below and click on Devices and Printers.
Step 3: The pop-up will display all currently connected devices in your computer, including storage devices such as the SD card. Please right-click on the icon, click on Troubleshoot, and wait for it to finish.
5. Format SD Card
You can utilize the Windows Disk Management tool to format storage devices such as your SD card. Blaming the card back to a “fresh” or default state might help fix some issues with the card.
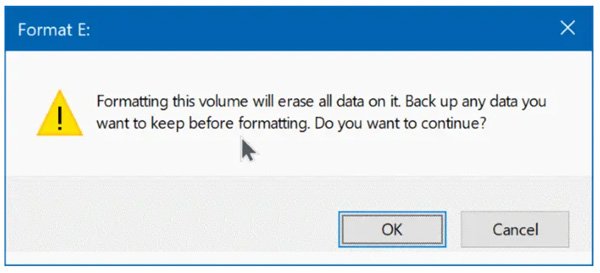
Step 1: Click on your search bar and type disk management. The option Create and format hard disk partitions will pop up. Click on this. Then, look for your SD card among the drives to right-click and select Format.
Step 2: In the format window, customize the volume label, file system, and allocation unit size. Next, choose whether to perform a quick format, enable folder compression, and click OK.
Step 3: The Disk Management tool will send out a warning message to you, which reads, “Formatting this volume will erase all data on it. Back up any data, you want to keep before formatting. Do you want to continue?” Click OK to format the SD card, which should finish in a minute if the quick format is selected.
6. Uninstall Faulty Applications
There have been isolated reports of the SD card deleting files by itself after installing specific applications on their devices. Whether the apps maliciously tampered with the SD card or not, it can be hard to determine which exact app caused this.
Step 1: Open your device and start backtracking on when the issues with your SD card started. Some devices allow you to check on the dates when installing apps.
Step 2: From the suspected start date of the issue, start uninstalling the recently installed apps. Hopefully, these aren’t essential apps needed in your work or personal life.
Step 3: Observe your device for a couple of days after the “cleansing” and see if your SD card would still randomly lose files.
Check to see how to find hidden apps on Android aqui.
Tips and Tricks to Stop SD from Unexpected Erasing
Whether it’s mishandling and damage to the card or just having a corrupt SD card, here are some tips and tricks to avoid the SD card deleting files.
Tip #1: Ensure Cleanliness of the SD Card
Check the SD card and its post for any dust or small debris like crumbs. If food crumbs and other small contaminants have somehow found their way into your SD card slot or on the card itself, you should clean it immediately. It would be best to have a tiny dental floss brush and some water/alcohol to wipe it clean.
Tip # 2: Avoid Downloading or Installing Suspicious Files and Software
Don’t just start clicking on random links and downloading files and software with suspicious or unknown origins. Virus and malware can easily damage your device and your SD card as well.
This concludes our article on your SD card deleting files by itself. We hope that these methods have helped fix the problem for you. If the problem persists, it might be best to purchase a new one instead or visit a technician with expertise in storage devices.